
Build Terminology
Metadata → Terminology→ Build
This process can quickly build a the code lists for a full study, a subset of domains or a single domain directly from the NCI / CDISC standard code lists.
The Metadata tool provides a rapid utility to allow you to quickly build a full list of CDISC/NCI controlled terms and code lists for any study in seconds.
Any version of the CDISC/NCI Controlled Terminology document.
A blank Microsoft Excel file.
Open Microsoft Excel.
Navigate to the Metadata ribbon.
Locate the CDISC section of the ribbon.
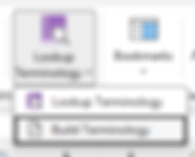
Click the Lookup Terminology drop down then click the Build Terminology button.
A prompt will appear.

Select either SDTM or ADaM from the Category drop down list and then the controlled terminology versions will auto-populate.
TIP if the user is unsure which Category to select, simply select ADaM and this will ensure the search process checks both the SDTM and ADaM controlled terminology documents.
Click OK to continue, and the range selection window will appear.
Here the user defines the Domain, e.g., DS.
Then the Variable Range and Code List Range is selected.
The Variable Range contains all the variable names, e.g., STUDYID, USUBJID, etc.
The Code List Range contains the code list names, e.g., DOMAIN, NY, NCOMPLT, etc.
Once these three components are defined the user can click OK to continue.
After some time the code list selection window will appear.
The process loops through each variable in the defined variable range, and for any variables which are controlled by a code list, i.e., the code list range is populated. The process looks up the defined code list within the CDSIC/NCI controlled terminology document, and if found returns the code list values.
IMPORTANT: When a code list was not found a prompt appears informing the user.
Here the user can select one, select all, or skip to the next variable.
Once the process is complete the user can choose to manually copy the tables, in full or in part.
Alternatively the user can Export the contents directly into an Excel workbook, like so.
To Export the code list information to an existing Excel template, click the Export button under the variable level table.
A prompt will appear.

Assuming the user wants to export the code lists to an existing worksheet, the Existing Worksheet option as selected.
Then the existing worksheet can be selected from the Existing Worksheet drop down list which, will be the name of the existing worksheet the code list information will be exported to, e.g., CT.
IMPORTANT: The Worksheet Name field has no impact here and is disabled when the Existing Worksheet option is selected and is disabled.
Click to OK to begin the export process.
Once exported, navigate to the chosen worksheet to see the code lists.

The chosen code list has been successfully exported onto the worksheet.
The process can be re-run again if required with no impact to previously exported code lists.