
Create Archive
What Does It Do?
The Metadata tool can create review-ready archives, with all the components created for a study stored in a easy to navigate folder.
What Do You Need?
-
Any study components
Guide
-
Open Microsoft Excel.
-
Navigate to the Metadata ribbon.
-
Locate the Packages section of the ribbon.

-
Click the Create Package button in the Packages section.
-
A prompt will appear.

-
Ensure the Package Type is set to Archive.
-
The Package Scope needs to be set based on the stage of the project:
-
Tabulation: Only the tabulation (i.e., SDTM) work has been completed.
-
Analysis: Only the tabulation (i.e., SDTM) and or analysis (i.e., ADaM) work has been completed.
-
TFL: All categories have been completed.
-
-
Then select the CDISC value, for example purposes, Yes will be selected.
-
IMPORTANT: For example purposes the Package Scope was set to TFL.
-
Also ensure the following fields are populated:
-
Archive Name is populated with the relevant archive name, e.g., First Draft.
-
Client Name is populated with the relevant client name, e.g., Programme.
-
Protocol Number is populated with the relevant protocol number, e.g., CT0-0012.
-
Internal Study Number is populated with the relevant project number, e.g., C24-ZZ.
-
-
IMPORTANT: Unselecting the Default Directories option, allows the user to manually select the directories for the study components, as opposed to using the standard locations, making the tool full customizable. If this is unchecked, a prompt will appear which is not illustrated below.
-
IMPORTANT: Unselecting the Default Components option, allows the user to manually select the items required for the archive / delivery, as opposed to using the default items, making the tool full customizable. If this is unchecked, a prompt will appear which is not illustrated below.
-
Click OK to continue, the file / directory tree window will appear.

-
IMPORTANT: For the Archive process, everything is selected by default. A user can uncheck whole sections or individual components. They can see the contents of a directory and even open the directory directly from the user form. The Orange text implies the directory was not found, the Blue text indicates the directory was found but was empty. It helps user quickly see missing components. Below is a short video of some of these features.
-
IMPORTANT: For example purposes, since the Package Scope was set to TFL, all components in the tree above were selected.
-
Click OK to continue.
-
A prompt will appear indicating the process is copying the files to the archive.

-
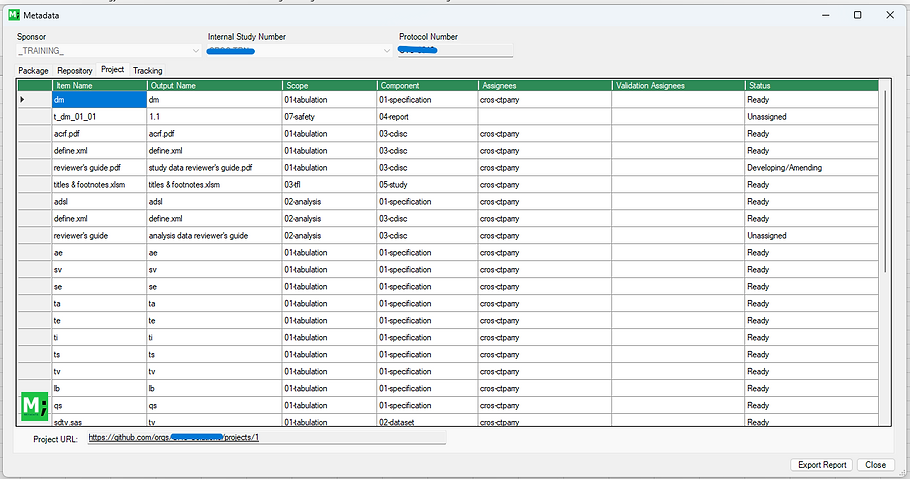
After some time, the Report Window will display. This window is split into multiple sections Including:
-
Package
-
Repository
-
Project
-
Tracking
-
-
Package - this section details the contents of the package itself, displaying every component included and the basic metadata around the component, like its location, size, extension, status, etc. It also details if any files were not found.

-
Repository - this section details all the programs found in the study's GitHub repository and displays the program's metadata like program name, program path, last author to commit and last date the program was commit.
-
IMPORTNANT: In short this section represents a live status report of all the programs in development at any one time. It has zero risk of human error and unlike like a manually created tracking form this version is a 100% accurate representation of the study's programs at the time the package was created.

-
Projects - this section details all the planned outputs destined to be created and their current production status, as well as author and reviewer which comes directly from the study's GitHub Projects area.
-
IMPORTNANT: In short this section represents a live status report of all the outputs destined for development in development at any one time. It has zero risk of human error and unlike like a manually created tracking form this version is a 100% accurate representation of the study's outputs at the time the package was created.
-
Tracking - this section details all the outputs included in the package and displays the output's metadata like program, program author, program last modified date, output date etc. as well as the output's components such as the log, the dataset, the transport file, etc.
-
IMPORTNANT: In short this section represents a typical tracking form on a study with one key advantage, it has zero risk of human error. Unlike like a manually created tracking form this version is a 100% accurate representation of the study at the time the package was created.
-
Finally the user can export this report to an Microsoft Excel file, which is store within the package.
-
Simply click the Export Report button, to see the export steps and exported report see the Report page.